Data Structure – Single Linked List In Brief
Single Linked List In Brief:
A linked list allocates space for each element separately in its own block of memory called a “node”. The list gets an overall structure by using pointers to connect all its nodes together like the links in a chain. Each node contains two fields; a “data” field to store whatever element, and a “next” field which is a pointer used to link to the next node. Each node is allocated in the heap using malloc(), so the node memory continues to exist until it is explicitly de-allocated using free(). The front of the list is a pointer to the “start” node.
A single linked list is shown in figure 3.2.1.

Single Linked List In Brief
The beginning of the linked list is stored in a “start” pointer which points to the first node. The first node contains a pointer to the second node. The second node contains a pointer to the third node, … and so on. The last node in the list has its next field set to NULL to mark the end of the list. Code can access any node in the list by starting at the start and following the next pointers.
Implementation of Single Linked List:
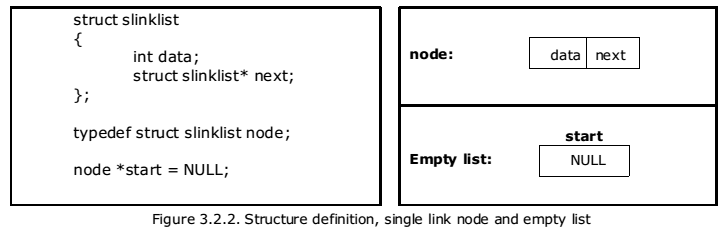
Before writing the code to build the above list, we need to create a start node, used to create and access other nodes in the linked list. The following structure definition will do (see figure 3.2.2):
- Creating a structure with one data item and a next pointer, which will be pointing to next node of the list. This is called as self-referential structure.
- Initialise the start pointer to be NULL.
The basic operations in a single linked list are:
- Creation.
- Insertion.
- Deletion.
- Traversing.
Creating a node for Single Linked List:
Creating a singly linked list starts with creating a node. Sufficient memory has to be allocated for creating a node. The information is stored in the memory, allocated by using the malloc() function. The function getnode(), is used for creating a node, after allocating memory for the structure of type node, the information for the item (i.e., data) has to be read from the user, set next field to NULL and finally returns the address of the node.
Creating a Singly Linked List with ‘n’ number of nodes:
The following steps are to be followed to create ‘n’ number of nodes:
The following steps are to be followed to create ‘n’ number of nodes:
- Get the new node using getnode(). newnode = getnode();
- If the list is empty, assign new node as start. start = newnode;
- If the list is not empty, follow the steps given below:
- The next field of the new node is made to point the first node (i.e. start node) in the list by assigning the address of the first node.
- The start pointer is made to point the new node by assigning the address of the new node.
- Repeat the above steps ‘n’ times.
Insertion of a Node:
One of the most primitive operations that can be done in a singly linked list is the insertion of a node. Memory is to be allocated for the new node (in a similar way that is done while creating a list) before reading the data. The new node will contain empty data field and empty next field. The data field of the new node is then stored with the information read from the user. The next field of the new node is assigned to NULL. The new node can then be inserted at three different places namely:
- Inserting a node at the beginning.
- Inserting a node at the end.
- Inserting a node at intermediate position.
Inserting a node at the beginning:
The following steps are to be followed to insert a new node at the beginning of the list:
- Get the new node using getnode(). newnode = getnode();
- If the list is empty then start = newnode.
- If the list is not empty, follow the steps given below: newnode -> next = start; start = newnode;
Inserting a node at the end:
The following steps are followed to insert a new node at the end of the list:
- Get the new node using getnode() newnode = getnode();
- If the list is empty then start = newnode.
- If the list is not empty follow the steps given below: temp = start; while(temp -> next != NULL) temp = temp -> next; temp -> next = newnode;
Deletion of a node:
Another primitive operation that can be done in a singly linked list is the deletion of a node. Memory is to be released for the node to be deleted. A node can be deleted from the list from three different places namely.
- Deleting a node at the beginning.
- Deleting a node at the end.
- Deleting a node at intermediate position.
Deleting a node at the beginning:
The following steps are followed, to delete a node at the beginning of the list:
- If list is empty then display ‘Empty List’ message.
- If the list is not empty, follow the steps given below: temp = start; start = start -> next; free(temp);
Deleting a node at the end:
The following steps are followed to delete a node at the end of the list:
- If list is empty then display ‘Empty List’ message.
- If the list is not empty, follow the steps given below: temp = prev = start; while(temp -> next != NULL) { prev = temp; temp = temp -> next; } prev -> next = NULL; free(temp);
Deleting a node at Intermediate position:
The following steps are followed, to delete a node from an intermediate position in the list (List must contain more than two node).
• If list is empty then display ‘Empty List’ message
• If the list is not empty, follow the steps given below.
if(pos > 1 && pos < nodectr)
{
temp = prev = start;
ctr = 1;
while(ctr < pos)
{
prev = temp;
temp = temp -> next;
ctr++;
}
prev -> next = temp -> next;
free(temp);
printf("\n node deleted..");
}
Traversal and displaying a list (Left to Right):
To display the information, you have to traverse (move) a linked list, node by node from the first node, until the end of the list is reached. Traversing a list involves the following steps:
- Assign the address of start pointer to a temp pointer.
- Display the information from the data field of each node.
Using a header node:
A header node is a special dummy node found at the front of the list. The use of header node is an alternative to remove the first node in a list. For example, the picture below shows how the list with data 10, 20 and 30 would be represented using a linked list without and with a header node:
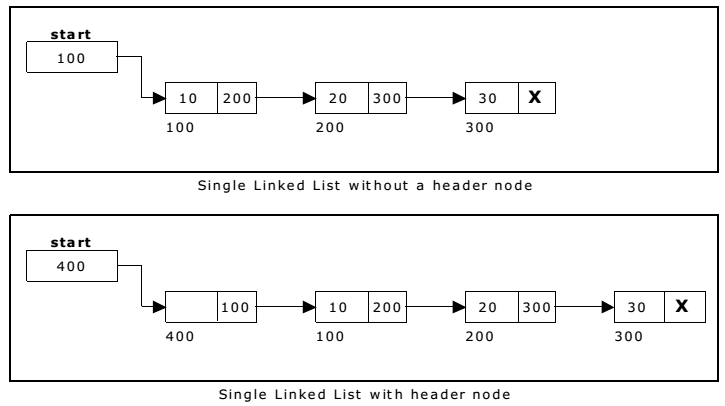
Note that if your linked lists do include a header node, there is no need for the special case code given above for the remove operation; node n can never be the first node in the list, so there is no need to check for that case. Similarly, having a header node can simplify the code that adds a node before a given node n.
Note that if you do decide to use a header node, you must remember to initialize an empty list to contain one (dummy) node, you must remember not to include the header node in the count of “real” nodes in the list.
It is also useful when information other than that found in each node of the list is needed. For example, imagine an application in which the number of items in a list is often calculated. In a standard linked list, the list function to count the number of nodes has to traverse the entire list every time. However, if the current length is maintained in a header node, that information can be obtained very quickly.